
Indian Sweater Designs(from Garhwal)
 ( for new born baby)
Things required:
1. wool
2. knitting needle
3. simple needle
(How to start after border line), front view
3.1
(ii) After first line, stitch another line which is called opposite flap line, here is the video..
Traditional design,opposite
video no: 8
(This is called straight stitch)


- Pinx...

Things required:
1. wool
2. knitting needle
3. simple needle
Here are few common steps to make yr Sweater..(Bt before we start here are few suggestions for u)
a. For thick wool - we will take less no. in counts of ( stitches)
b. For thin wool - We will take more no. of ( stitches)
STEP 0. Border : - Make border line with the help of 10no. knitting needle. Here is the video..
video no: 1
(Border line)
(Border line)
U can make border line like this with single thread, but this is not long durable. So U can use 3-4 no of threads instead of one (How? U can see in the next video,this will help u to understand), but for practice u can use this procedure..
video no 2:
(Border line)
STEP 1: Repeat this step again and again..(mention this..)
(a) For Kids-Below 3yrs - 60 stitches
(b) For kids - above 3yrs - 75-80 stitches approx
(c) For 20-25 yrs - -85-90 stitches
(d) For above 30 yrs - 100-110 approx stitches.
(i) After this procedure, You have to stitch two lines..one is straight stich line, here is video..
video no:3
(How to start after border line), front view
3.1
video no: 4
Traditional design,straight (Back view)(ii) After first line, stitch another line which is called opposite flap line, here is the video..
video no:5
Traditional design,opposite
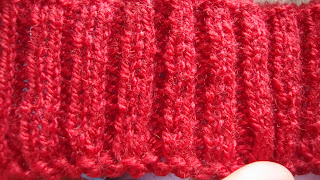
(B) There are different kind of borders. But I am showing you here 2types of border. Here is the photo with video..
photo: Design no 1

Rib design (border)
video no:6
Design no. 2
video no:7
video no: 8
small bead design
after 5inches...
STEP 2:- Starting of the middle part - Add 10-15 more stitches. Then start with normal stitch.First straight stitch then opposite stitch..here is the video ...
video no:9
(This is called opposite stitch)
video no: 10(This is called straight stitch)
(If u want to add some designs in place of these traditional straight or opposite stiches, make them. I am giving you here few designs also with video)
FOR KIDS:- procedure
STEP 3: - You have to make at least (for length)
For kids - 8inches+ 4 inches approx
For adults - 16inches+4 inches(or u can measure,which length u like)
STEP 4: From both the sides, 3- 3 stitches (reduce or bind off) approx (max 5) For arms..
how to reduce or bind off stitch?
here is the video: u can prefer this link because i dont have video of this rite now..i will upload it later..
STEP 5: Again make one more 8inch approx of design for adults and for kids 4 inch approx ( For front and Back same procedure till now).
For the front part only..
FOR ROUND NECK: For Kids :-
STEP 6: After 8inch:- In center leave10 stitch for neck, and close them or (bind off) pin them and leave those 10 stitches.
STEP 7: After this make 8inch more, in separate knitting needlees.
STEP 8: After this for SHOULDERS, in both the knitting needle take only 22-22 stitches and remaining (bind them).
How to join shoulder points or front or back flap of the sweter? Here is the video:
video no:11
STEP 9: Join the sides of both flap front and back. Make sure it is correct joined or not.
STEP 10: For ARMS ( side) raise 80 stitches (for sleeveless). Bt how to raise stitches? here is video..
video no:12
STEP 11: For NECK (Center ) raise 110 stitches. (Mention that - raise neck stitches only when shoulder side stitches joined or raised). Which one is yr border Design same will be yr neck design also..:- This whole procedure is for sleeveless
For sleeves:
(i) Make border of thin wool- 40 stitch and for thick wool 35 stitches. (same as front part we have done)
(ii) After 4inch, add 10 stitches more to them.
(iii) In first line of the knitting needle 1 stitch is added..
then after2 rowx 1
4x1
6x1 (approx)
max 80-85 stitches. not more than that..
FOR ADULTS:
1. Border: 110 front back both.
2. After 5 inch add 10 stitches = 120-125 stitches.
3. After 16inches 4 inch close or bind off 3 stitches from both the sides.
4. After that make 8inch+4inch more.
5.For neck- in center leave 12 stitches (for round neck)
6.For neck- raise 160 stitches.
7.For shoulder : for thin wool 32-32 stitches in both separate knitting needle
for thick wool 30/5 -30 stitches as well
7. For shoulder- raise 110 stitches.
8. For v- neck: in center leave 1 stitch. and raise 40-45stitches on back portion and 70-75stitches on both of the front part.
9. For Sleeves: Border 50-55
after that add 15 stitches
And same procedure as kids - 1x1, 2x1....


and your sweater is ready..
If u have any doubt regarding these procedure plz ask me freely...
nice designs! my Grand mother used to make these designs on sweaters. She also used to stitch different rangoli designs on the sweaters.
ReplyDelete